AI Labels for Face-Anonymized Videos: TikTok and YouTube
Label realistic AI-anonymized faces on TikTok and YouTube. Choose the upload setting, explain what changed, and check each post without revealing your real face.

If your finished video shows a realistic AI-anonymized face, disclose the AI change when you upload it. Use TikTok's AI-generated content setting or select Yes under YouTube's AI use, then add a short explanation of what you filmed and what AI changed. You can explain the edit without publishing your original face.
Illustrative scene: a camera points toward a handmade bowl, with a blank note card beside it. Keep your explanation of the finished video with the material you're preparing to post.
These steps cover prerecorded videos on TikTok and YouTube. For another platform, check its current upload guidance rather than assuming the same setting or wording applies.
Decide from the video viewers will see
Start by watching the finished export. Write down what AI changed: the face, the voice, a background, a generated introduction, or several of those things. That gives you something specific to disclose and helps you avoid describing the whole video as generated when much of it was filmed.
TikTok's AI-content guidance requires labels for realistic AI-generated content and treats substantial AI changes to a person's appearance as significant editing. YouTube's disclosure guidance covers meaningful AI alterations to realistic-looking content, while distinguishing minor aesthetic changes and non-realistic material. For a realistic anonymized face, use the disclosure setting rather than assuming the edit is a small beauty adjustment.
For example, imagine you film a pottery demonstration and anonymize your face in the introduction. Your hands still shape the real bowl in the footage you recorded. A useful explanation identifies the face edit and the filmed demonstration separately. It doesn't need to imply that AI made the bowl or performed the technique.
The choice changes if you use an entirely generated presenter, add invented footage, or generate narration. Explain those changes too. The face-anonymization versus avatar guide can help you distinguish an edited performance from a generated presentation before you choose the wording.
| What's in your finished video | Useful description | What to avoid |
|---|---|---|
| Your filmed performance with a realistic AI-anonymized face | Say that the face is AI-anonymized and identify the filmed part | Calling the visible face your unedited appearance |
| A generated presenter before a real demonstration | Say the introduction uses a generated presenter and the demonstration was filmed | Implying the presenter physically performed the task |
| A face edit plus generated narration | Explain both the face and audio changes | Saying “only my face changed” |
| A separate hands-only take with no AI face edit | Describe the take you actually published; assess other AI use separately | Reusing the explanation from an anonymized version |
If you haven't settled on a face treatment yet, the blur, crop, mask, and AI comparison covers that earlier decision. Pick the method that fits your footage, then describe the result you chose.
Turn on TikTok's label before posting the video
Follow TikTok's video-label instructions:
- Tap Add post (+) and upload your reviewed video from your device.
- Continue to Next.
- Open More options and turn on AI-generated content.
- Review your description and other post choices before publishing.
Prepare the explanation before you reach this screen. That way, you aren't trying to decide what the face edit means while also choosing a cover, sound, and audience. Read the description after pasting it: a saved caption from another clip may refer to a different edit.
TikTok may apply an automatic AI label, and its help says an automatically applied label cannot be removed. Don't wait for automatic detection to handle a disclosure you already know the video needs.
If you can't find the control, keep the post unpublished while you consult the linked help and check the app you're using. Avoid following a tutorial for a different upload surface simply because its screenshots look familiar.
Choose AI use in YouTube Studio
YouTube's current upload instructions use AI use in the Attributes section:
- Open YouTube Studio and begin uploading the reviewed video.
- In Attributes, find AI use.
- Select Yes for a realistic video with a meaningful AI face alteration.
- Continue through the other video details.
You may encounter older tutorials calling the control Altered content. Look for the current AI disclosure choice in your upload flow rather than searching only for that older name.
Use the description to give viewers a more precise explanation. A broad platform label can't tell them which part of a mixed video you filmed. For the pottery example, a short sentence about the anonymized introduction and real demonstration answers that question without sharing the camera original.
Keep your draft private while you check the upload and its details. Choosing a visibility setting is a separate action from choosing an AI disclosure. If the source still needs a face correction, return to the edit instead of treating a disclosure as the correction.
Explain the edit without revealing your original identity
A useful explanation names the change and gives enough context to understand the content. It doesn't need your legal name, a photograph of your original face, or a reason for wanting privacy.
For the pottery video, you could write:
My face is AI-anonymized for privacy. I filmed the pottery demonstration.
Use that wording only if it accurately describes your video. If the introduction is generated, a clearer version would be:
The introduction uses an AI-generated presenter. I filmed the pottery demonstration.
If you also generated the narration, say so. You don't need to list every ordinary editing operation, but don't make a narrower statement than the work you've done.
Avoid broad phrases such as “everything is real” or “no AI” when the visible face was meaningfully altered. Also avoid “fully anonymous.” A face edit and an AI label don't answer whether the rest of the clip contains your voice, a familiar room, or personal details. Use the faceless-video privacy checklist for that separate review.
Put the explanation where it belongs with the post. A note in your profile can explain your usual approach, but it may be inaccurate for a particular video. A generated introduction and a hands-only take need different wording even when they belong to the same series.
If you're handing the upload to an editor, send the approved sentence with the finished file and tell them which platform setting to choose. They should not have to infer the AI work from how convincing the face looks.
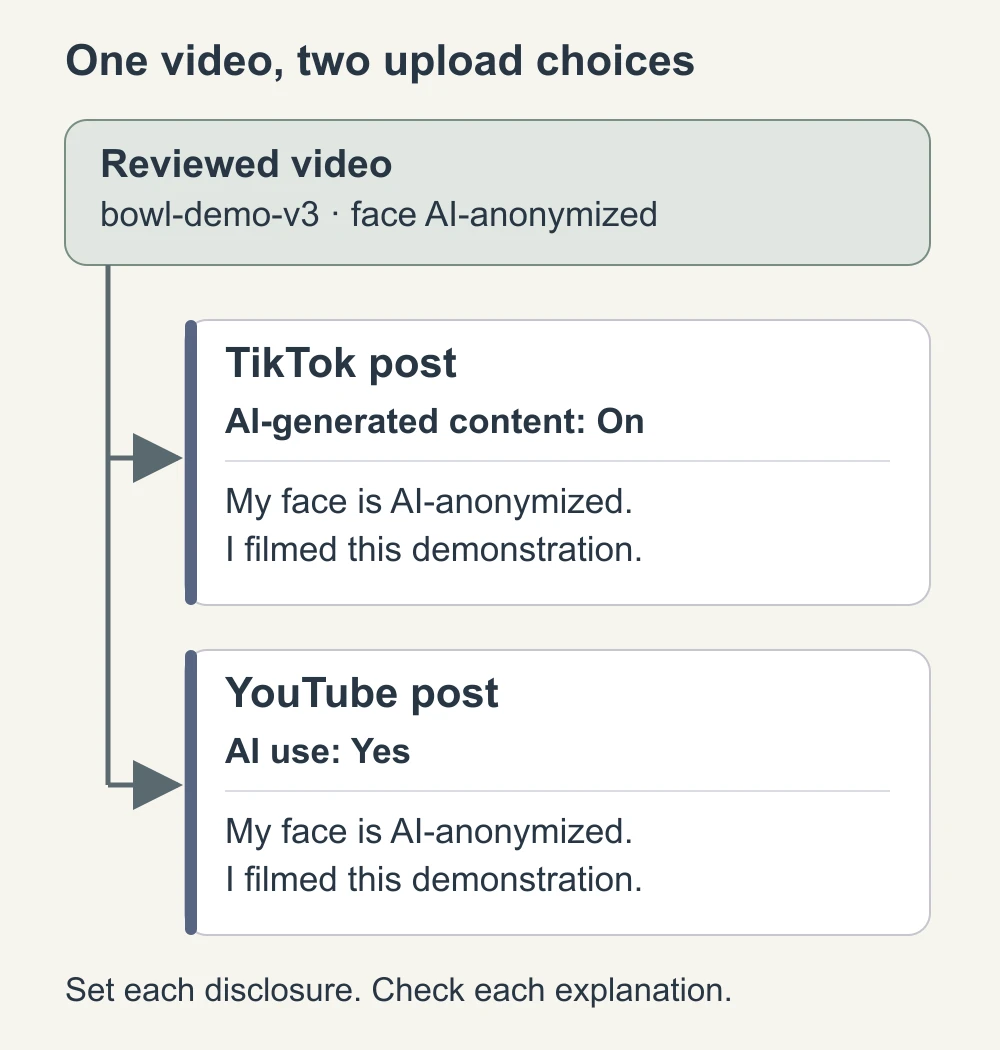
Keep the explanation matched to every version
For face anonymization in NeoFace, the photo and prerecorded-video workflow takes you through selecting a synthetic face, uploading footage, reviewing the result, and downloading a copy. Prepare your platform disclosure for the copy you've reviewed. Handle the upload setting in TikTok or YouTube yourself.
A short clip cut from the main video deserves another wording check. Suppose the long version includes an anonymized face in the introduction, but the shorter take shows only the bowl and hands. Don't automatically paste “my face is AI-anonymized” onto that take. Conversely, don't copy a hands-only description onto a cut that includes the anonymized introduction.
Keep a small posting note with the finished files. It can contain the file name, destination, AI changes, approved explanation, and whether you checked the setting. Use neutral names such as bowl-demo-v3 rather than personal details. This is especially helpful when someone else handles one platform's upload.
For cross-posting, check the TikTok and YouTube choices independently. Completing one upload doesn't tell you what was selected on the other. If a collaborator changes the narration or inserts a generated scene, revisit the explanation before publishing that version.
This note needn't become a complicated spreadsheet. For two uploads, two clearly written entries are enough. The point is to know which file and explanation went to each post, so you can correct a mismatch later.
Check the published post and correct mismatches
After publishing, open the post and read its surrounding text as a viewer. Confirm that the description refers to the uploaded version and that the platform's AI information is present. Keep a record of the post URL and the disclosure choice you made.
If the label or explanation seems wrong, compare the finished file with your posting note before changing anything. Did you upload the hands-only cut, the anonymized introduction, or a later version with generated narration? Fix the description to match what viewers can see and hear.
For a YouTube disclosure error, consult the AI disclosure controls. Some automatic labels can be adjusted, but labels attached through YouTube's AI tools, Content Credentials (information about how a file was made), or manual review cannot. Keep a required disclosure in place; an inconvenient label isn't evidence of an error.
A label also doesn't make every use of AI permissible. TikTok explains that some edited content remains prohibited even when labeled. Use an appearance you have permission to use and don't imply that somebody else took part in your video.
If the problem is an exposed original face or private information, correct the video itself and review the new file. A more detailed AI caption won't hide an unwanted frame.
Before you publish
- I've checked the finished video and know which parts AI changed.
- The AI disclosure decision fits this version, not an earlier take.
- I've selected the required setting on each destination platform.
- The explanation distinguishes my filmed footage from generated or altered material.
- The wording adds no original portrait, real name, or unnecessary personal detail.
- Any editor handling the upload has the finished file and approved explanation.
- I've kept a note of the file, post destination, and disclosure choice.
- I'll open each published post to check its AI information and description.
Frequently asked questions
- Do I need an AI label if I filmed the video myself?
- Filming the source yourself does not settle the disclosure decision. If AI meaningfully changes a realistic face in the finished video, disclose that change. Judge the version viewers will see, including any generated sound or scenes.
- Do I have to show my real face to explain face anonymization?
- You can explain the edit in words: “My face is AI-anonymized for privacy; I filmed this demonstration.” That tells viewers what changed without adding an original portrait, a real name, or a before-and-after comparison.
- Is an AI hashtag enough for YouTube?
- Use YouTube’s AI use setting when the video meets its disclosure requirements. A hashtag or description can explain your process, but it should not replace that upload choice.
- Does an AI label mean the platform has approved my video?
- No. An AI label describes how content was made. It does not give permission to publish somebody else’s likeness or override the platform’s other content rules.
- Should I describe a hands-only video as AI face anonymization?
- Only if that describes the video you are publishing. If you filmed a hands-only take with no face edit, do not copy a face-anonymization explanation from another post. Assess any other AI-generated or altered material separately.
Stand Out While Staying Anonymous
Join thousands of creators building faceless brands with Neoface. Private by default, lifelike by design.
No credit card required · Instant access · Free plan available